Showing posts with label Recipes. Show all posts

Thursday, August 20, 2015

Pickles!

How can you not smile, at the very least, at the word "pickles?" Seriously. (It also brings me back to the early days of Nick Toons...) Say it three times. Feel good?
Awesome.

And who doesn't love the taste? My husband. That's who.

Regardless, he was enamored with the pickle-making process. I threw these together the day before our mini-vacation (is three days a mini-vacation, including driving? Or is it a full-blown vacation?) to use up a bunch of the cucumbers we'd been hoarding from our weekly CSA boxes. Of course, we still have more, but I figured 6 pints would do us just fine and help with the glut of cukes.

You can make these refrigerator pickles and make this quick as well as easy. But, nope, in the midst of cleaning, doing laundry, packing, and the usual toddler-watching rigmarole, I undertook the delight of washing and sterilizing mason jars, rings and lids. Silly girl.

It really wasn't that bad. I'd call it "easy" if you follow the steps. Just not quick. And, of course, I went rogue, so we'll see how they turn out in the end!

I used the recipe blogged about on Elephant Journal, but made some adjustments. I left out the green onions (more room for cukes! Shove 'em in until you can't shoves no more, folks!) and tried one with more garlic, another with some habanero pepper. But, when it was time to process the jars in hot water, I'm afraid I might've ruined the texture of 'em -- one site I read said to process for 5 minutes after reaching a boil, which meant that NONE of the jars sealed. Attempt #2, they all sealed. However, that means that the final pickles will probably be a little limp. If they taste good, though, I'm happy. ;-)

I'm thinking about giving the green and yellow beans I've got a "dilly bean" treatment. Can you believe I've never tried 'em? I know. Bad, BAD natural mama.

Oh, and if you're wondering: Hadman loves pickles. He's been picky about a lot of veggies lately (fruits, however, he could survive on, so thank goodness for small victories), but I think if I continue to preserve and save - and I totally mean in a "zucchini muffins" way - them in ways like these, he won't know what hit him.

Mwahaha.

So, here's my version of the recipe...


Homemade Dill Pickles (for 6, 1-pint containers)  

- 6-8 cucumbers, washed and sliced (however you like them, but the bigger they are the better texture they'll have)
- dill seed (NOT weed), about 1 tsp. per jar
- lots of garlic, smashed, 3+ per jar
- red pepper flakes, pinch per jar (or more)
- ground pepper or peppercorns, 1/2 tsp. or so per jar
- thinly sliced jalapeno or habanero pepper, optional

Put spices in the bottom of each jar. Tightly fill with cucumbers (and pepper, if using). Pour following brine to cover cucumbers, cover with lids, and seal.

Brine - Simmer the following until dissolved: 3/4 c. apple cider vinegar, scant 1/4 c. white vinegar, scant 1/2 c. water, and 3/4 T. salt PER JAR {for me, this came to about 4 1/2 c. ACV, between 1 1/4 & 1 1/2 c. white, about 2 c. water, and 4 1/2 T. salt total}. Slowly pour into each jar before processing.


So, who else attempts pickling? What's YOUR favorite recipe? I'd love to try different ones out.

Friday, June 19, 2015

CSA - Week #3

I swear to all that is holy, I don't plan on doing a weekly recap of our CSA box.

Think I'm fooling? I don't even remember everything we got this week. Broccoli...radishes...beets...lettuce...potatoes...and I know I'm forgetting something. So, there. Neener. Not recapping the whole thing because I'm a total slacker.

I AM, however, loving trying the new foods. So, when I find a recipe that works for us, I share. That's what my mother always taught me to do, so here I am.

I really think I should start calling these Iron Chef CSA Challenges or some such thing because you seriously have no idea what you'll be getting and at least one ingredient is usually something you've NEVER cooked with in your life. This week, beet will be my challenge. (I've only ever had Harvard beets and pickled beets, both delicious, but never from scratch.)

Week #2's "mystery ingredient" was bok choy. I've heard of it...knew it was used in some Chinese dishes...and that was it. So, I didn't get creative or reinvent the wheel. I threw some brown rice on the stove and looked up some recipes for stir-fry. Then, as per usual, I tweaked it. Hmm. Maybe that'll be my superhero name: Recipe Tweaker. I can see the leotard now.


Stir-Fry with Chicken and Bok Choy

- 1-2 cloves garlic, minced
- 1 tsp. grated ginger (ours is local hydroponic; we keep it in the freezer and slice right off the frozen piece, no need to peel!)
- several tsp. olive oil (whatever oil you like; coconut would work well, too)
- 2 boneless skinless chicken breasts, cut into chunks or slices
- 2 carrots, washed & chopped
- 1/2 - 1 red pepper, sliced
- 1 head bok choy, separated: leaves chopped, white part sliced or diced

Sauce :
- 1/4-1/2 c. soy sauce (we were low)
- 1/4 c. water
- 1-2 tsp. corn starch
- 1-2 Tbsp. rice vinegar
- dash+ red pepper flakes

Mix together sauce ingredients and set aside.

Heat up oil in a large skillet over medium to medium high and add garlic and ginger, cooking about 1 minute (watch it!). Add chicken and cook until no longer pink. Add carrots, pepper, and white parts of bok choy and cook until crisp-tender. Add bok choy leaves and cook until wilted. Add sauce and cook until thickened.

Serve over rice or noodles. Add another dash of red pepper flakes or soy sauce if you wish. Peanuts over top are yumm-o, too.

*Seriously, use whatever vegetables you have on hand. ALMOST anything will work.*

The verdict? Hadley's not a big stir-fry person, but Dave and I liked it. I might have liked it more (like, REALLY liked it), but he's super polite. I didn't notice a hugely overpowering flavor, especially considering how much bok choy was in the dish, but a mild flavor. Will definitely make again, now that I know what to do with the thing.

Now, on to the beets. I'm envisioning reddish purple hands.

What about you guys? Try any new foods lately? Have any suggestions for a beet recipe the little man will actually tolerate? (I have some pickled beets in the cabinet I may try on him, just to see how he feels. He loves sour stuff, usually.) 

Wednesday, June 10, 2015

CSA Week #2

Last week, I talked about our first CSA box. In some ways, it was a success; in other ways, we dropped the ball. It was an awesome learning experience.

Since it's so early in the season, most of our take involved lettuces. We didn't tend to and prep the produce quickly enough, so some of it went bad. I put the chives and lovage into some water, but the lovage turned quickly and I wasn't able to use it. Lesson #1: Fresh produce goes rotten quicker than even the fresh grocery store produce. I kind of knew it already, but naively lost track of time.

It doesn't mean that we didn't use lots of the lettuce, the chives, radishes (still looking for some more recipes for those), green onions and Swiss chard.

So, I thought I'd share a recipe that came out pretty darn well. I based it on this recipe, but made slight variations.


Sauteed Swiss Chard with Parmesan and Lemon

2 Tbsp. bacon drippings
1 Tbsp. butter
1/2 small onion, diced
1 Tbsp. garlic, minced
1 bunch Swiss chard (separate ribs/stems and chop; chop leaves separately)
splash white wine
1 Tbsp. lemon juice
2 Tbsp. grated parmesan (or more)
salt to taste (optional)

Heat bacon drippings and butter in saute pan over medium-high heat. Add onion and garlic and cook about one minute. Add chard's ribs/stems and white wine; cook about 5 minutes. Add rest of leaves and cook until wilted. Add lemon juice and sprinkle with parmesan.

Would be great with a sprinkling of red pepper flakes or crumbled bacon. 


This week's box includes: more salad (not nearly as much), including "head lettuce", frisee, arugula, and spinach; broccoli, broccoli raab, salad turnips, bok choi, and spearmint.

Things are getting interesting now! The ones I'm most excited about figuring out will be bok choi (I assume I'll be making stir-fry at some point), salad turnips and spearmint.

I was lucky enough to get a list of the week's take before heading to the grocery store tonight, so my meal plan includes a beef gyro type thing. I'm hoping the tzatziki I make will be improved by the mint. Plus, I'd like to try fresh mint tea. *fingers crossed*

I had never heard of salad turnips before, either, but have found that they can be eaten raw and are on the sweet side. So, we'll be using them in salads, and I may finally make some homemade hummus to try dippin'.

Now, to use up these radishes... 

Monday, March 16, 2015

St. Patrick's Day Green

I'm an Irish girl. Er. Irish-American. Whatever. But, still, the vast majority of my ancestors? Irish peasants. I'm fascinated and proud of the heritage.

That said, I've never used the traditional "Irish" holiday as an excuse to drink. It's an awesome holiday, of course, but the people who tend to go all out (whether Irish or not, whether they know a lick of information about St. Patrick himself) make me shake my head. I still remember going to a college class on St. Patrick's Day only to observe heads in garbage cans and bodies of passed-out people riddling the common areas. At 9AM. I'm not a prude, but... No. Words.

But, if you're planning on hitting the pubs this year, try a different green beverage before donning those green beads.

We recently tried out this recipe for super-simple "beginner's luck green smoothie." Dave hadn't jumped on the smoothie bandwagon yet, and none of us had tried a green smoothie. Of course, Hadley LOVED the thing, and Dave enjoyed his more than I expected. Our variation of the original goes like this...


Beginner's Luck Green Smoothie
(adapted from 100 Days of Real Food's recipe)2 cups spinach
1 cup milk (any kind)
1 cup water
1 banana, in chunks
1 cup frozen strawberries
1 cup pineapple chunks

Blend the spinach with the liquid until smooth. Then add the rest of the ingredients and blend until you've reached the consistency you prefer. (Add more liquid if you like it thinner, or use all frozen fruits or ice cubes for a thicker consistency.)

***************************************

Ours was perfectly sweet with the mix of banana, strawberries (which Hadley requested) and pineapple (although the pineapple admittedly left a few random "strands" of texture here and there), but you could drizzle in agave, honey, or a sprinkle of sugar if you need it. 

Leftovers might just help alleviate a hangover. *wink, wink*

And if you wear some green in celebration (or, um, drink green beer), here's a little trivia for you: The green (of the Irish flag) doesn't represent the green grasses and shamrocks of Ireland so much as it does the many Irish Catholics who died at the hands of Protestant rulers. In the 1700s and 1800s, while England and Ireland clashed, Irish persons were hanged for wearing green.

So, please. Wear it proudly.

Or drink it proudly, as the case may be.

Wednesday, December 17, 2014

Gingerbread Pancakes

There's something about molasses. The mere smell or tiny taste of it automatically transports me back to my grandmother's kitchen. Her spice cabinet was filled with its scent, and I vividly recall sitting on her countertops staring into her bowl of molasses cookie dough (and occasionally giving it a stir). Her soft cookies were a family favorite.

So, it's no surprise that I'm also a gingerbread fan. Like, huge. My mother once brought gingerbread to celebrate my birthday instead of a cake in college, and it was AWESOME. There's just something about the spongy, spicy goodness (topped off with homemade whipped cream...always homemade).

I decided to make some of my "mug" pancakes in the gingerbread tradition, complete with (real) butter, (real) syrup, aaaaaand whipped cream. Yep. Let's just say they're perfect for your Christmas morning. Oh, and try using some greased cookie cutters on the griddle to make adorably festive shapes!


Gingerbread Pancakes

1 mugful flour
1 mugful milk
1 egg
about 1/8 - 1/4 c. molasses
1 tsp. cinnamon
sprinkle clove
1/4 tsp. ginger
pinch salt
1 1/2+ tsp. baking powder
1/2 baking soda
1/2 tsp. vanilla

Whisk together dry ingredients and spices. Separately, whisk egg with molasses and vanilla, then add, along with milk, to dry ingredients. Don't overmix.

Cook in greased skillet or griddle over medium heat in spoonfuls (depending on size you prefer). Flip when you see bubbles appearing.

Top with butter and syrup, cinnamon and sugar, vanilla yogurt, or a dollop of homemade whipped cream (or a variation of any of these).

---------------------------------------------------------------

These would be a perfect holiday breakfast, along with some sausage or thick-cut bacon and sweet potato hash browns. Hope you enjoy them, too!

Friday, October 31, 2014

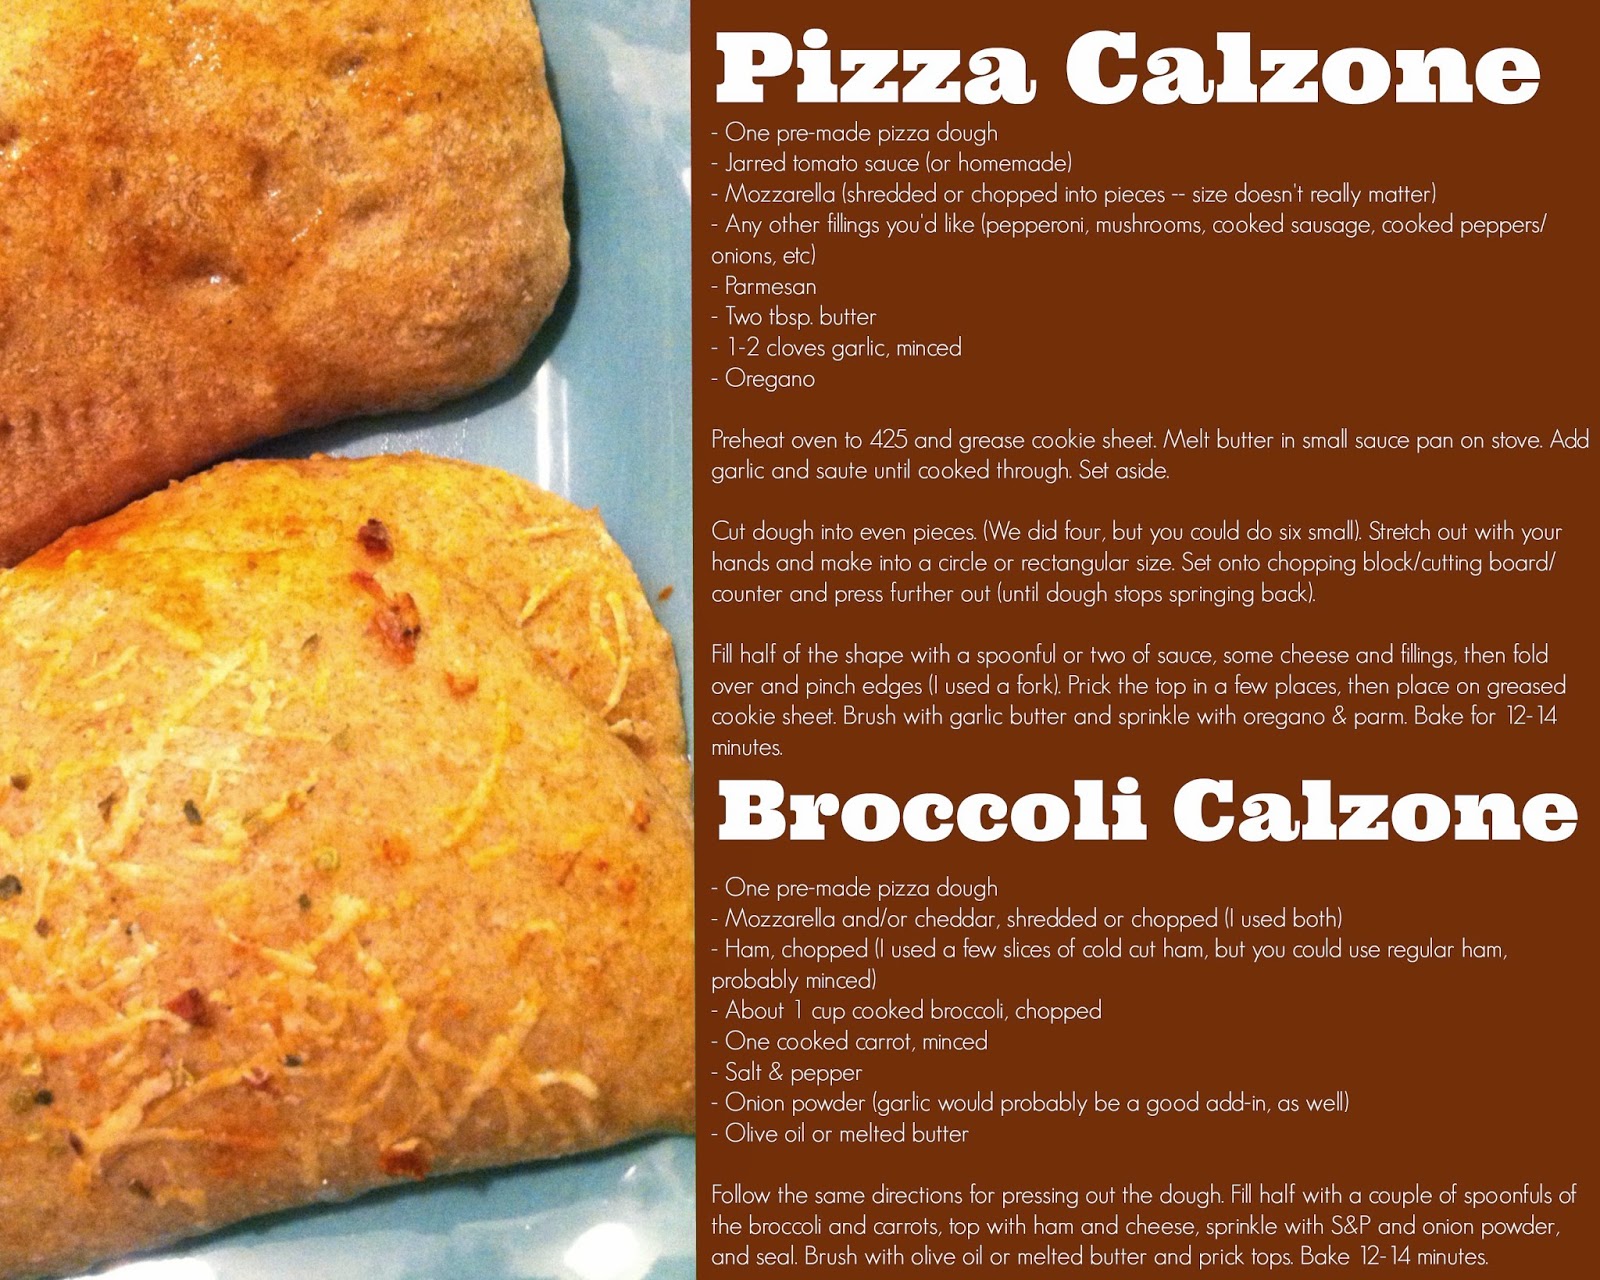
Another Use for Pizza Dough

Happy Halloween, guys! On crazy nights like tonight, I tend to throw together something super quick. Sometimes pasta, sometimes soul and a sandwich, but most of the time pizza. I love pizza. It's seriously, like, my favorite. If Dave could have one food for the rest of his life, it'd be salad. (I'm not kidding.) Me? Pretty sure it'd be pizza.

Last week, I had these two whole wheat pizza doughs getting closer and closer to their "probably should just throw those out" dates in the freezer. And it got my gears going. What to do with them...other than pizza?

So, today's recipe is relatively simple. Honestly, it's as easy as you want to make it, or as complicated as you want. You can cook intricate stuff up to add as fillers, or you can just toss in some sauce and cheese and call it a day. You can take my tip to make your own garlic butter or just drizzle some EVOO on top. No big.

Oh, and I used one pizza dough for each recipe -- got four "calzones" (I'm not Italian, but Dave kept calling them calzones, so I'm going with that as a name) of the "pizza" kind and four "calzones" of the broccoli kind. They're more filling than you may think, so I ended up freezing a few for future lunches. Oh, and feel free to cut the pizza into 6 or even 8 pieces; just cook for less time (until browned on top). If you want huge ones, to two, but they'll probably cook closer to 20-25 minutes.

I've gotta say that the broccoli/ham/cheese one was insanely tasty. The pizza one was good, too, of course...but, yeah. Broccoli FTW! Who knew?

{If you need to see the recipe better, click on it. It'll open up much larger.}


Have fun out there and be safe tonight! :-) My favorite part is after the ghosts and goblins have headed home for the night. We'll most likely be popping some popcorn, pouring some cider, and watching some Charlie Brown. Loving that it's on Friday this year!

Monday, July 14, 2014

Best Birthday Gift Ever

Today I've got a different type of recipe for you -- and there are several variations you can try, so feel free to mix it up all you like. Oh, and one warning: the ingredients take FOREVER to find (ahem, make), but they're worth the effort. Seriously.

Want a cheese sandwich? Start with some bread...cheese, of course...a piece of lettuce...maybe two...a tomato (if you're into that sort of thing)...then top it off with another fluffy slice....


Just serve with a carrot or two and you've got an awesome lunch. Yum!


Or you could just pull a Dorky Daddy and have a salad for lunch. (He'd have two salads for dinner...then more salad for dessert. Seriously.) Personally, I'd switch out the tomato for strawberries.


Speaking of strawberries...grab a few for a snack! (Pardon the water spots.)


Oh, you're in the mood for breakfast? We've got that covered, too. Eggs and toast, perhaps?


So, this was my "big present" for the monkey's birthday. It doesn't look like much, but I've worked on them every night for a month or two...so...yeah. Just the hours alone make them pretty valuable. And the fact that he and his cousin started playing with them immediately (and that they're, apparently, a cat toy, as well), which makes all the time worth it. Big time. :-)
I'm hoping to make a pizza or more breakfast items for Christmas. They're not hard to make, just time intensive. Whip stitch...whip stitch...whip stitch.... Yep, there's your tutorial. That's all you need. Cut out the shapes (I free-handed) from felt, whip stitch the edges until you die, then stuff with filling...or fill with stuffing, whatevs. Rinse and repeat. The cheese was just a cut-out of orangey-yellow felt; that one was super easy and made up for how time-intensive the rest were. ;-)

Depending on where we live at that point, we'll also try to work on a kitchen area for Hadman to house all of his spoons, spatulas, and pots the utensils and pots he's stolen from me and for further pretend play. He's in love with them, so I'm super happy that these turned out so well and were well-received. (By the way, he's mixed them with the food toys he already owns -- the ones with the smiley faces -- below...and a stuffed turkey. Which makes sense. Maybe.)


Oh, and for anyone wondering, I'm working on a quick birthday rundown post for this week, too. We hope you had as awesome a weekend as we did!

Friday, May 23, 2014

Clean Out the Fridge Burrito

That title makes this meal sound absolutely nauseating. Sorry 'bout that.

We had a handful of items floating around (read: taking up awkward space) in the fridge recently, so I threw together what turned out to be a tasty (and super-filling) lunch. Seriously, make a side and this could easily be dinner.

And, since my pictures were too massive to make a GIF (oops), here's the exact play-by-play. You don't even need a recipe. Just start with a tortilla (whole-wheat, in this case) and put whatever you want into it. You don't even need to heat anything up before assembling; just throw it in the microwave for 2-3 minutes (or more, if it needs it), and voila!

Side note: For mine, I used leftover rice, black beans, corn, rotisserie chicken, some salsa and a sprinkling of cheese. Feel free to sprinkle with some S&P or cumin and chili powder for some kick. Even add more veggies -- cooked broccoli or asparagus would be yummy.

'Kay. So, here's the pictorial recipe. I won't even talk. Promise.


*Lets out air* No idea why those middle ones wouldn't turn to match the rest for me, sorry 'bout that! But, seriously, who else is impressed by that one-handed burrito folding??

Oh. Just me, then? M'kay, that's cool. Well...hope you try it and like it -- and the clean fridge when you're done!


Friday, May 2, 2014

A Lovely Lunch

A long while back, Dave and I had a celebratory dinner at a lovely steak joint. Strangely enough, the most memorable part of the whole meal has stuck with me for years. It's strange because the best part of that incredible meal was our salads.

Yes, we're salad people (Dave more so than me; he could live on it) but this was the best salad I've ever had. All thanks to the incredible dressing. Isn't it weird how, no matter how wonderful the ingredients, the dressing can make or break a salad?

I recently made a variation of the dressing, and my reasons for posting it are twofold: 1) I thought you guys might like to try it, and 2) I'm purely selfish - a quick blog search is the best way to find a recipe I like (I do it 2-3 times a month for my mini meatloaf recipe).

So, since it would be weird to post just a dressing recipe (wait...I've done that before), here's the lunch I made for Dave and I. By the way, you'll get used to the fact that it's a warm vinaigrette.  I promise!

Mixed Salad with a Warm Bacon Vinaigrette 
3-4 slices bacon (cut in half)
1-2 shallots (depending on size; I had 1 large and 1 small)
A good splash of vinegar (I used white wine, but white or apple cider would work)
1/2 tsp - 1 tsp dijon mustard (I honestly used deli mustard, LOL)
1-2 tsp sugar or honey (maple syrup would probably work beautifully, too)
Splash olive oil if needed

Salad greens (I mixed mixed greens with extra romaine)
Strawberries (optional - I used, Dave didn't)
Tomatoes (optional - Dave used, I didn't)
Hard boiled eggs (optional - again, me not him)
Shaved Parmesan or Romano

Bring eggs to a boil and start cooking bacon on medium to medium-high heat. While cooking, plate your lettuce and prep your add-ins (and finely chop your shallot).


Do you really need a visual of bacon and eggs cooking? Sure, why not?

When ready, drain bacon on paper towels. Place all but 4-5 tbsp of bacon grease in a separate bowl; in the 4-5 tbsp, toss the shallots and cook until soft and translucent. Take eggs off heat, drain, and replace water with cold a few times (a cold rinse helps). 

When shallots are done, add the sugar, vinegar, and mustard and whisk to combine. Finish assembling salads by arranging sliced eggs, strawberries or tomatoes, drizzling with the vinaigrette, crumbling two half-slices of bacon (per plate), and shaving cheese on top. 

Finish with salt and pepper (though not necessary) and enjoy!


This made enough for two large "lunch" salads, and we took the leftovers for "work lunches" the next day. I had to throw a little extra EVOO into the dressing to make enough for the next day, but if you reserve your extra bacon fat, this won't be an issue. Just a heads-up.

Give it a go and let me know how you like it! And, while you're at it, let me know -- what was in the BEST salad you ever had?

Friday, April 4, 2014

Brussels Sprouts That Don't Suck

Happy Foodie Friday! Now, on with the show...

You heard me right, Universe. I know what you're thinking: Brussels sprouts, those sometimes-slimy, cabbage-like fart bombs. That you put in your mouth. And eat.


Normally, I would agree 100%. I grew up harboring a hate-hate relationship with them, and for that matter anyone who tried to make me ingest them. So. Nasty.

This relationship would've lasted for all time until my awesome brother-in-law Dan brought along his caramelized maple roasted Brussels sprouts to our last Thanksgiving feast. Consider me converted...and on a mission to convert others. 

So, all these many months later, I finally bit the bullet and bought some on-sale sprouts. I'll admit that I was nervous. I've tried roasting them before only to have Dave sweetly request that I never make them again. (Ahem. He's not really a jerk, for the record. It was one of those rare super honest moments. Can't blame him; fart bombs in your mouth aren't fun. I didn't enjoy them, either.)

But, there was no need to worry this time. Despite being in the thick of chaos and accidentally turning off the oven mid-roasting (see? Even an idiot...), these came out awesome. There's really no way to mess them up, either, so use this as a guideline and less of a real recipe. Love those.

Roasted Maple Brussels Sprouts
1 1/2-ish lbs. Brussels sprouts
Salt and pepper
Olive oil 
1/4 c. (give or take) pure maple syrup (not "pancake syrup" or whatever that is)
2 tsp. (or more) brown sugar

Trim any brown or wilted leaves (there will be a huge pile left, seriously) and wash and dry sprouts. Cut into halves and cut off bottom "stem" part.


Place on baking sheet and douse with good amount of olive oil and salt and pepper. Toss. Roast at 400 degrees F for about 15 minutes and toss. Drizzle with syrup and brown sugar and roast another 15-20 minutes or until tender and caramelized.


Seriously, it may look like a wilty, burnt pile of nothin', but it is beyond delicious. Enjoy, and let me know what you thought!

I kid you not, I was stealing wayward leaves and black bits off of the baking sheet. I have no shame.

Friday, January 24, 2014

About Those Balls

Alternate title: Love Me Some Balls. (I'm a 13-year-old kid, I swear to God. Or an awesome Alec Baldwin SNL sketch.)

So, anyhoo, I made some meatballs this week and didn't really think anything of it. Pasta's a norm around our house (like, a once-a-week occurrence). However, we usually keep it easy and vegetarian, since we're still eating about 50 percent meat (half of our meals with/without, if you will), give or take a meal here and there.

See, when I grew up, our spaghetti or baked ziti or lasagna (we ate very little of this after a vomiting bug incident...ugh) HAD to have meatballs. Actually, almost every meal had to have meat, but we were a meat-and-potato type family. Mom was June Cleaver, only with a career. #madrespect

She worked on her meatballs for years. She craved perfection. Baked or fried? Fresh or dried herbs? How much garlic is "too much"? WHY ARE THESE FLAT HOCKEY PUCKS INSTEAD OF MEATBALLS??? It was actually a tad entertaining to observe, from a child's perspective. We always gave honest reviews -- a little hard, a little mushy or fally-aparty (technical analysis, I tell ya), no flavor -- but, really, they were always good.

One day, she perfected them. Man, was she proud, and I can't blame her. They were a thing to look forward to.

Fast forward twenty years and my stepdad now makes them. They're far from perfect, but, hey -- a man who makes dinner? Can't complain about that.

And at our house? I haven't made them since Hadley came along. I don't make my own sauce (oh, yes...Mom makes her own, too...talk about self-loathing, points to self), so I just boil some salty water for pasta, throw on a pot of Paul Newman's organic sauce, and throw a couple of salads together (a "must" for my hubs). It's just the easiest way for us. Maybe one day I'll be inspired to make my own sauce. And freeze extra for five future meals. Like Mom.

But, last Tuesday, I had some local, grassfed beef laying around after making chili over the weekend. I could've made some mini-meatloaves, which I know my guys love, but I decided to make some meatballs (along with extras to freeze for later -- I'm catchin' on, Ma!) to throw in, too. Hadley's a carnivorous youngster, so I knew he'd like the flavor. (Yep. I called it.)

Funny thing is, I didn't think to take pictures or anything. I mentioned it briefly on Facebook and someone politely asked for the recipe -- to which I kindly directed them to the Rachael Ray recipe I altered. Apparently, even my altering would be appreciated. Who knew? Lesson learned. Note to self: Take pictures of everything I cook. Ever. Just in case.

So, here are Rachael Ray's altered balls. ;-) No offense, Rach.


Monday, January 13, 2014

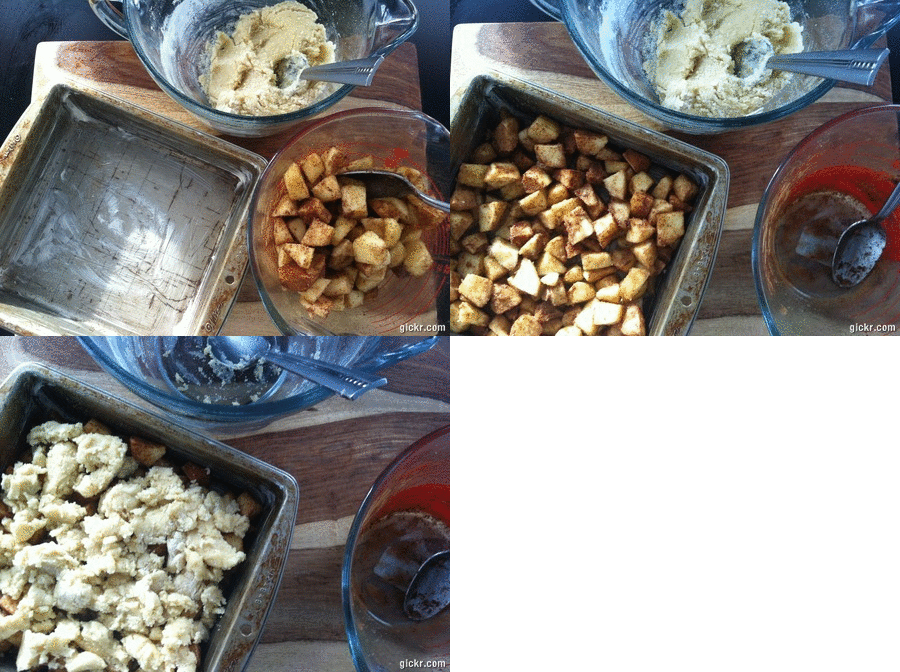
Apple Cobbler Thingie

Yay, a dessert recipe! Finally. Or maybe breakfast. Or snack. I love versatile recipes like that, don't you?? :-) Since when did this blog become a crappily photographed food blog?? Eh, it ebbs and flows, I suppose. Side note: Today's Hadley's 18-month birthday. Holy crap! One-and-a-half! I guess we need an update on what this kid's doing, huh? Will do.

So, anyhoo, I borrowed this recipe from Mommy Knows but changed it around a bit. It was a frigid cold day (haven't we all had those lately?) and I was home from school because of it, so it felt like the perfect time to crank up the oven.

I had some pretty little apples going south for the winter. See? Wrinkly with blemishes. But the girls still had life in 'em.


Sure, I could've made some applesauce (not much, mind you), but I wanted something heartier and a tad bit naughty. I WANTED an apple cake of some sort. Instead, I got this apple cobbler-type thing. Just as delicious. Just, um, unexpected.


And, yes, I'm just showing off with that self-made GIF. Get down witchya bad self!


Gratuitous close-up -- ready to be baked. Whuh whuh?? (Apparently I'm into '90s hip hop phrases today. Roo, I blame thee! Naw, it's all good.)

So, here's the recipe. Of course, I added nutmeg and clove to the apple filling part (you could leave them out and just use the cinnamon, but I'm a high roller). I also highly advise serving this warm, if possible, with some ice cream. We have yet to find organic ice cream, so we've found a minimal-ingredient "natural" vanilla from Breyer's that's a very, very rare treat since it still veers from our food ethics. Ya gotta live, though. Heck, in the summer, I know for a fact that we'll go to some burger joints (local ones, mind you) and share a cone of unknown ingredients (but quite known yumminess) with the little guy. I know, we're rebels.


Oh, and one final thing. When you go visit Mommy Knows, appreciate her not-so-subtle way of telling folks off about letting her daughter use a sharp knife to cut the apples. Love it! And hope you love this apple cake...cobbler...dessert.

Friday, January 10, 2014

Another Weelicious Treat

I made a yummy muffin from Weelicious back in September, and recently decided to try a different kind. I mostly make them for Hadley (because apparently he's spoiled...who knew? As my husband recently said, "Well, he eats better than we do" to which I thought, "Huh. We eat well, but that's probably true."), but they're great for grown-ups, too. Whether you need a snack to go with a cup of midday tea or coffee, or a quick breakfast option to send to the sitter, these tasty muffins have just the right amount of sweetness and spice to do the trick. 

Weelicious is a site dedicated to feeding kids of varying ages, although are always seem to be some good family-friendly recipes (read: you don't need kids to eat this stuff). Let's just say that this post could pretty much be in the form of a love letter to the mom behind Weelicious -- as well as a hope that she doesn't mind my sharing HER recipe, tweaked (not to be confused with "twerked") a bit. I'm all about giving credit where credit is due -- this isn't my recipe, it's just the way that I made it. Here's the recipe she created that gave me a jumping-off point.

And here's what I made...


PicMonkey strikes again! (Not perked...by PicMonkey or Weelicious. Just a fan!)

These would be great with walnuts (or almonds, maybe), and I'm always keen on adding some clove and nutmeg to anything apple-laden. We kept it pretty tame for the munchkin since these are essentially his snack/breakfast muffins.

Oh, and full disclosure: For whatever reason, the muffins seemed to stick to the super-cute paper liners that I used. Maybe I didn't wait long enough for them to cool before digging in (I tried!), or maybe it was just dumb luck, or maybe there's a fully logical physics-based reason to the issue (I skipped out on Physics, so...yeah...). I'd just suggest a) greasing the pan as advised in the original recipe or b) expect this to happen and accept the inevitable. It seemed better the next day (not completely, but better), so it's not like all your hard work will end up in the trash along with half of the muffin.

I also found myself (yes, folks) sniffing H's muffin yesterday. Sniffing it. I have no shame.

Friday, December 27, 2013

Christmas French Toast Casserole

For Christmas this year, I decided to make things a little easier on myself as far as breakfast was concerned. I guess with any meal, we could make things easier just with some extra planning (it goes for weekly meal planning and sticking to a budget when grocery shopping and a whole buttload of other food stuff that I'm only successful at half the time). So, after spending far too much time preparing our morning feast last year, my thoughts immediately went to french toast -- casserole, that is.

Now, I'm not usually a big fan of casseroles, but the ability to make it in advance and pop it into the oven as needed had me at "hello."

Here's the meal plan:

The day before (I did the first three earlier before our Christmas Eve get-together, then the last before bed) --
- Cut loaf of French bread into 1" squares
- Thaw bacon
- Dice/cube (depending on how big you like them) sweet potatoes for hash browns
- Assemble rest of casserole and allow to sit overnight in fridge

The day of --
- Turn on the oven and take out the casserole to sit for 30 minutes -- Open stockings :-)
- After stockings, throw the casserole in and start the hash browns in a frying pan with olive oil, salt, and pepper, over medium-low -- this should avoid any burning, and using a lid allows the insides of the potatoes to cook. If you like more brown, start higher and allow them to get some color before turning down.
- After opening the rest of your goodies, check on the casserole, stir the hash browns and cook any sausage/bacon.

If you like coffee, get that started first thing. We did tea, though, which doesn't take long at all.

The only way that I swayed from the meal plan was thanks to the fact that my boys slept in. So, here I was...up...not doing anything...so, I started the meat and sweet potatoes earlier than I probably should have and kept them at low before serving.

The french toast casserole recipe that I used came from Taste of Home, but while I decided to throw in some extra cinnamon and some nutmeg, it made the top appear burned (but it wasn't). So, if I make it again, I'll do a sugar topping (maybe with a little cinnamon mixed in) but probably put most of the seasoning in the egg mixture. Regardless, here's the recipe, in case anyone wants to try it:

French Toast Casserole

1 loaf french bread, cut into 1" cubes
8 eggs
3 cups milk (I used whole; you could use half and half, but I wouldn't do skim or 1%)
4 teaspoons sugar
1 teaspoon vanilla
3/4 teaspoon salt
a few sprinkles of cinnamon (or you can mix more directly into the casserole)

Topping:
2 tablespoons butter
3 tablespoons sugar
2 teaspoons sugar
1/2 teaspoon nutmeg

  1. Place bread cubes in a greased 13-in. x 9-in. baking dish. In a large bowl, whisk the eggs, milk, sugar, vanilla and salt. Pour over bread. Cover and refrigerate for 8 hours or overnight.
  2. Remove from refrigerator 30 minutes before baking. Dot with butter. Combine sugar and cinnamon; sprinkle over the top.
  3. Cover and bake at 350° for 45-50 minutes or until a knife inserted near the center comes out clean. Let stand for 5 minutes. Serve with maple syrup if desired. Yield: 12 servings.

So, what do you do for holiday mornings? (You know -- those days when things are crazy enough without having to figure out a way to sustain the family until that late afternoon meal.) Casseroles? Do you eat breakfast? Brunch? Do tell! It'd be great to hear how other folks juggle the holiday craziness. 


On that note, I hope you all had a wonderful Christmas! It seems to have come and gone so quickly!

Monday, December 23, 2013

Here We Come A-Wassailing

Almost every year, we haul our heinies out to Cooperstown to the Candlelight Evening the Farmers' Museum puts on (we skipped last year since the bambino was, like, crazy little...I use "little" loosely). The Farmers' Museum is seriously one of my favorite places ON EARTH. It's a living history site where houses and buildings from the mid-19th century have been transplanted to create a small village-like atmosphere. 

There's a building with an exhibit, but the rest is like a step back in time. The print shop creates mailers and flyers for events; the blacksmith makes shoes for the horses (it is the Farmers' Museum, after all), old flat, square-headed nails, and products for the store; the "house" has a front AND back garden (GAH! LOVE IT!) and, depending on the time of year, shows how folks were putting things up or weaving and dying their own clothes or baking up a storm; the broom-maker (I'm sure that's not the real name) shows how they were made; the "hotel" (which has an awesome balcony) is opened serving food and showing just how different it was to stay in an inn back then...and so on. I wish I could live there.

So, this year, we literally braved a brutal storm to have a family visit. There was only one goal for the day -- to see Santa. The REAL Santa. We actually know the fellow who portrays him, so the fact that he says "hello!" to us by name is beyond cool. He dresses more like St. Nick, with short pants (freeeezing!), a real beard, a long hat, and a big sack flung over his shoulder.

But, thanks to the storm (we're freaking crazy -- we always plan for the coldest possible weather -- I wore 2 pairs of pants, wool socks, 3+ shirts, a hat, two pairs of gloves...still cold), there were hardly any lines. So, that being said, we got to have our first ride on a horse-pulled wagon (where Hadley viewed Santa, or "Ho Ho", from a mile away), chat up the printer on our own (I have a secret: This is the warmest spot in the place, thanks to their TWO stoves. I learned it on my 4th grade field trip, when I was assigned to the print shop and got to create my own "business cards" and "greeting cards". You're welcome.), and down some wassail.

We caught up with Santa before he started his story time at the school building, and Hadley was enamored with him. Oh, he also handed over an old-fashioned (albeit red dye-laden) chunky peppermint stick which he sucked on for a half hour. (I grabbed chunks out of his mouth and ate them so he didn't choke. He still doesn't have enough top teeth to help in this respect.)

Then, we finally headed indoors to hear some more caroling and buy two HUGE turkey dinners (which came with cocoa and HUGE pieces of gingerbread, which Hadley enjoyed) before trekking back home at half the speed in low visibility. But, we don't care. It. Was. So. Worth. It.

So, if you'd like to experience some of the old fashioned Christmas, try some mulled cider. Wassail. Whatever you call it, it's a lovely way to cozy up on a chilly winter's night. And what makes it even better? It's super simple to make. You don't even need cauldrons over huge bonfires (which is how they do it at the museum).

Here's another one of my "wing it" recipes, but it's only because you really can't mess it up. Want to sweeten it? Use maple syrup or sugar or whatever you like to use to sweeten stuff. Or don't; it's still delicious!) Don't have cloves? That's okay, leave it out this time (although use it when you have it on hand again...I respectfully advise. ;-)).

WASSAIL

2 1/2 cups apple cider
1/4 - 1/2 c. orange juice
1 -2 tbsp. maple syrup or sugar (or not)
1 tsp. (or less) cinnamon; or 2-3 cinnamon sticks
1/2 tsp. (or less) nutmeg
1/4 tsp. (or less) clove

Bring all the ingredients to a boil on the stove and stir; reduce heat to low and allow to simmer for as long as you can wait. (Five minutes...ten...or thirty. Whatever floats your boat.) If you don't like "things" in your beverages, strain into mug and enjoy. Serve with a cinnamon stick if you're a fancypants.

* Grown-ups who REALLY need a warm-up, throw a shot or two of rum in and say "good night." Or, at least, that's what would happen to me. I really can't hold my booze anymore.


Friday, December 20, 2013

C is for Cookie, That's Good Enough for Me

Is it not the strangest thing in the world that the characters that we grew up with so many decades ago are still cherished by the youth of today? There must be something innately appealing to little ones. The fur? The colors? The voices? Hadley is enamored with Sesame Street characters (he watches the old episodes as well as the new ones, although we try to skip over that Abby Cadabby crap) as well as Mickey (I'm 50/50 on this one -- I love that he enjoys "A Mickey Christmas Carol" from beginning to end, but I don't want him to be surrounded with Disney paraphernalia or to feel the need to visit the "most wonderful(ly overpriced) place on Earth"). Along with his dozen or so words, he has gestures for each of his favorite Sesame Street characters -- "bam bam bam" (arm with fist pounding) for Oscar and "nom nom nom" (open hand to mouth repeatedly) for his favorite, Cookie Monster.

So, while I made Christmas cookies last year, this is the first year that OUR little Cookie Monster can actually partake in the treats. I try to keep my versions "real food" friendly -- using butter instead of Crisco, organic raw sugar rather than white, unbleached organic AP flour rather than the regular bleached (I didn't do whole wheat because I wanted to try to keep the consistency relatively similar, but you could do half-and-half or even all whole wheat if you don't mind a texture switcheroo), and so forth. Honestly, most of what's in these is organic and GMO-free, which is our priority right now.

Oh, and fun fact time: I only make cookies my husband will WANT to eat. Sure, he'll eat my favorites (anything with peanut butter), but he doesn't necessarily WANT to, which means he ends up "forgetting" they're sitting in our cookie container until they go stale or I eat them all (whichever happens first...ahem). So, I ask Dave what his favorites are, fully realizing that my mom or sis or someone equally lovely will provide me with a couple of peanut blossoms or chocolate-covered peanut butter balls at some point this holiday season...and I sleep soundly knowing that my hubby and son will eat the crap out of whatever I have made. It's all good. Maybe one day (when he's able to eat nuts; we're not testing his allergy levels to nuts quite yet!) I'll have a house full of kids that will override Dave's aversion to "super peanut buttery" things. That'll be the day!

I made these cookies in less than an hour each on two different nights, after Hadman had gone to bed. First was the jam thumbprints.

Now, back in the day, I used to make these with Ina Garten's recipe (my mom LOVED them when I made them -- isn't that the greatest feeling, to make something for the person who made everything for YOU and to have them enjoy it that much?), which was so full of butter I can't even stand it (yum!). But, I didn't use that recipe because a) they made a million cookies (we don't need a million) and b) they were covered in coconut. My husband's a basic guy, so I made the equivalent of shortbread cookies...with a thumb smashed in...with some wayward jam poured in for good measure.

Here's the recipe I used (from Love and Olive Oil - LOVE this site!) --


Jam-Filled Thumbprint Cookies


Yield: 40 cookies
Cook Time: 20 minutes
Total Time: 1 hour

Ingredients:

  • 1 cup (2 sticks) unsalted butter, room temperature
  • 2/3 cup granulated sugar
  • 2 large egg yolks
  • 1 teaspoon vanilla extract
  • 2 cups all-purpose flour
  • 1/2 teaspoon salt
  • 6 ounces (or so) assorted jam

Directions:

  1. Preheat oven to 375 degrees F. Line a baking sheet with parchment paper or a silicone mat.
  2. Beat together butter and sugar with an electric mixer on medium-high speed until light and fluffy, about 2 to 3 minutes. Beat in egg yolks and vanilla extract. Add flour and salt and mix until incorporated and dough comes together in a ball.
  3. Form dough into 1-inch balls and arrange on prepared baking sheet. Flatten balls slightly with your thumb or the back of a small spoon, leaving an indentation in the center.
  4. Bake cookies for 8 to 10 minutes or until bottoms are just barely golden. Remove baking sheet from oven. If indentations look shallow, further define them with the back of a spoon and then fill each with approximately 1/2 teaspoon jam. Bake for an additional 3 to 4 minutes, or until jam melts slightly and edges of cookies are lightly golden. Transfer cookies to wire racks to cool.

Read more at http://www.loveandoliveoil.com/2013/09/jam-filled-thumbprint-cookies.html
Jam-Filled Thumbprint Cookies

1 cup (2 sticks) unsalted butter, room temperature
2/3 cup granulated sugar
2 large egg yolks
1 tsp. vanilla extract
2 cups all-purpose flour
1/2 tsp. salt
6 oz. (or so) assorted jam (I used a test pot of "razzleberry" jam, some apple butter {Delish! And super sweet}, and some strawberry/blueberry/rhubarb jam)

Preheat oven to 375 degrees F. Line two baking sheets with parchment paper (not waxed) or a silicon liner (I used parchment on one but ran out and used butter on the other; they both came out fine).

Beat together butter and sugar with an electric mixer on medium high until light and fluffy, 2-3 minutes. Beat in egg yolks and vanilla. Add flour and salt and mix until incorporated and dough comes together in a ball.

Form 1-inch balls and arrange on baking trays (they won't expand much at all). Press slightly with your thumb or the back of a teaspoon to form an indentation for the jam.

Bake for 8-10 minutes until bottoms are barely golden. Remove from oven. If indentations look shallow, press a bit more. Place approx. 1/2 tsp. of jam or jelly in each indentation before placing back in the oven for 3-4 minutes (until lightly golden). Transfer cookies to cool on a rack.


Jam-Filled Thumbprint Cookies


Yield: 40 cookies
Cook Time: 20 minutes
Total Time: 1 hour

Ingredients:

  • 1 cup (2 sticks) unsalted butter, room temperature
  • 2/3 cup granulated sugar
  • 2 large egg yolks
  • 1 teaspoon vanilla extract
  • 2 cups all-purpose flour
  • 1/2 teaspoon salt
  • 6 ounces (or so) assorted jam

Directions:

  1. Preheat oven to 375 degrees F. Line a baking sheet with parchment paper or a silicone mat.
  2. Beat together butter and sugar with an electric mixer on medium-high speed until light and fluffy, about 2 to 3 minutes. Beat in egg yolks and vanilla extract. Add flour and salt and mix until incorporated and dough comes together in a ball.
  3. Form dough into 1-inch balls and arrange on prepared baking sheet. Flatten balls slightly with your thumb or the back of a small spoon, leaving an indentation in the center.
  4. Bake cookies for 8 to 10 minutes or until bottoms are just barely golden. Remove baking sheet from oven. If indentations look shallow, further define them with the back of a spoon and then fill each with approximately 1/2 teaspoon jam. Bake for an additional 3 to 4 minutes, or until jam melts slightly and edges of cookies are lightly golden. Transfer cookies to wire racks to cool.

Read more at http://www.loveandoliveoil.com/2013/09/jam-filled-thumbprint-cookies.html

The other cookie that Dave requested, which I also made last year, was Chocolate Crinkles (although he just called them "the chocolate ones that get wrinkles all over with white sugar all over them"). It took awhile to find one that just used cocoa powder (homey don't got time for meltin' chocolate), and all I had was some leftover Hershey stuff (and while it's not organic, it's natural, non-alkalized, etc so it's pretty good), but my powdered sugar was organic from our trip to Vermont and they came out just right -- puffy and "wrinkly" and tasty.

For this recipe, I turned to Williams-Sonoma. Wait, what?! Yep. I scoured the Internet (okay, the first page of the Google search) and it hit all the marks: 1) used cocoa powder vs. melted chocolate (or a combo of both) and 2) only made a couple dozen cookies (again, we don't need a million hanging around that won't get eaten and will turn stale). And, for future reference (to myself...hi, future self!), it's from a kid-friendly cookbook...so, yeah, Hadley can help someday.

Chocolate Crinkle Cookies

1/2 cup confectioners' sugar
1 2/3 cups all-purpose flour

1/2 cup unsweetened cocoa powder
(reviews suggest between this and 3/4+; use what you like)
1 1/2 teaspoons baking powder

1/4 teaspoon salt

8 tablespoons (1 stick) unsalted butter, at room  temperature
1 1/4 cups sugar

2 eggs1/2 teaspoon vanilla extract


(Love that the recipe said this: "Be sure an adult is nearby to help." I asked my husband to stand by. ;-))


Preheat an oven to 350°F. Grease 2 baking sheets with butter.

Put the confectioners' sugar into a bowl and set aside. (I didn't use half of this amount, so feel free to start with half and use more as needed.)

In another bowl, using a wooden spoon, stir together the flour, cocoa, baking powder and salt. Set aside.

In a large bowl, using an electric mixer, beat the butter and sugar on medium speed until creamy, about 3 minutes. Turn off the mixer and scrape down the bowl with a rubber spatula. Add 1 egg and beat on medium speed until blended. Add the other egg and vanilla and beat until blended. Turn off the mixer and add the flour mixture. Beat on low speed just until blended.

Using a tablespoon, scoop up a rounded spoonful of dough. Scrape the dough off the spoon into the palm of your other hand. Roll the dough into a ball. Roll the ball in the confectioners' sugar until covered. Place the balls on a prepared baking sheet. Repeat, spacing the balls about 2 inches apart.

When 1 baking sheet is full, put it in the oven and bake the cookies until they are crackled and puffed, 10 to 12 minutes. Using oven mitts, remove the baking sheet from the oven and set it on a wire rack for 15 minutes. Using a metal spatula, move the cookies onto the rack and let cool completely. Repeat with the rest of the cookies. Makes about 24 cookies.

Adapted from Williams-Sonoma Kids Baking, by Abigail Johnson Dodge (Oxmoor House, 2003).

I'm thinking of throwing together a molasses or ginger-type cookie since it's another kind that I DIE for -- maybe my grandmother's recipe (though I'm not sure if I have the right "kind" of molasses for that; seriously, they can end up taking up the whole pan if you're not careful, and I'm not aiming for molasses bars) or something like that. I also do cutouts, which we'll probably attempt as more of a hands-on family thing if Hadley actually wants to "make shapes." If not, I'll still make them and hopefully get a good, soft texture (vs. crunchy...you know the kind) so he can at least eat them afterwards. And, a nice, fluffy white frosting sounds perfect -- no dyes necessary. If I don't make these, though, it's fine -- at least I made SOMETHING. But, if I do make something, I'll be sure to share the recipes.

What about you? What cookies are you making this Christmas? Or if you're not baking any, are there any kinds that you're looking forward to eating? I'm always fascinated to hear what kinds of cookies folks consider a "Christmas cookie." Some are traditional (like Polish
Kruschiki or regelach - which I always thought was Italian, but the interwebs informs me is Yiddish - both of which I enjoyed as a child) while others make me go "huh?" (um...chocolate chip cookies? Really?) Do tell!